Machine : AMD CPU 8 core, Samsung 4GB Ram x 2, 1TB HDD,
OS Version : CentOS 6.3_x86_64
Xen version : Xen-4.1.2
1. CentOS 설치
CentOS 6 버전 부터 Kernel에 KVM이 포함되어 있어 Xen 설치시 충돌할 수 있습니다.
고로 최초 CentOS 설치시 minimal로 설치합니다.
2. CentOS Network 설정
minimal 설치시 IP가 설정되지 않아있음
# vi /etc/sysconfig/network-scripts/ifcfg-eth0
DEVICE=eth0
BOOTPROTO=static
HWADDR=FF:FF:FF:FF:FF:FF <- 미리 설정되어 있음
ONBOOT=yes
TYPE=Ethernet
IPADDR=10.0.0.2 <- 자신에 맞는 IP 부여
GATEWAY=10.0.0.1
NETMASK=255.255.255.0
NM_CONTROLLED=no
DNS1=168.126.63.2
:wq
#service network restart
#ping google.co.kr
ping이 가면 성공한 것이다.
3. 필요 패키치 설치
# yum -y update
# yum -y install screen vim wget tcpdump ntp ntpdate man smartmontools links lynx ethtool xorg-x11-xauth
# echo '%_topdir /usr/local/rpmbuild' > ~/.rpmmacros
# vi /etc/selinux/config
SELINUX=enforcing -> SELINUX=disabled 변경
# yum -y groupinstall "Development tools" "Additional Development" "Debugging Tools" "System administration tools" "Compatibility libraries" "Console internet tools" "Desktop Platform Development"
# yum -y install transfig wget texi2html libaio-devel dev86 glibc-devel e2fsprogs-devel gitk mkinitrd iasl xz-devel bzip2-devel pciutils-libs pciutils-devel SDL-devel libX11-devel gtk2-devel bridge-utils PyXML qemu-img mercurial texinfo libuuid-devel
# yum -y install glibc-devel.i686 rpm-build make
4. QEMU 설치
# mkdir down
# cd down
# wget http://www.kernel.org/pub/linux/kernel/v3.0/linux-3.3.7.tar.bz2
# tar xfv linux-3.3.7.tar.bz2
# cd qemu-1.2.0
# ./configure
# make -j8
# make install
5. Kernel Compile
# cd /usr/src/kernel
# wget http://www.kernel.org/pub/linux/kernel/v3.0/linux-3.3.7.tar.bz2
# tar xfv linux-3.3.7.tar.bz2
# cd linux-3.3.7
# make menuconfig
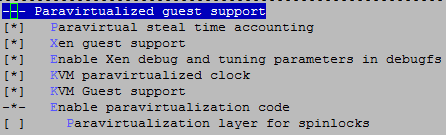
- Processor type and features
> Paravirtualized guest support
> Block devices
![]()
> Network device support
![]()
> Xen driver support

# make -j8 bzImage
# make -j8 modules
# make modules_install
# make install
리부팅시 shift 키를 눌러 kernel 3.3.7로 부팅한다. 귀찮으면 grub에서 설정해도 된다.
6. Xen Kernel Compile
# cd /usr/src/kernel
# wget http://bits.xensource.com/oss-xen/release/4.1.2/xen-4.1.2.tar.gz
# tar xfvz xen-4.1.2.tar.gz
# cd xen-4.1.2
# make world
# make install
xen 수정시 xen 관련 header와 lib를 다운받는다.
xen tools 컴파일
# cd tools/libxen
# make install
7. Grub 설정
Grub에서 xen-4.1.2 bzImage를 연결해준다.
xen-4.1.2 로 부팅한다.
# chkconfig --add xencommons
# chkconfig --add xend
# chkconfig --add xen-watchdog
# chkconfig xencommons on
# chkconfig xend on
# chkconfig xen-watchdog on
다시 리부팅 한다.
# xl info
명령어가 실행되면 성공한 것이다.
참고 페이지
1. http://blog.naver.com/albertx/100169050099 (많은 도움이 됨)
2. http://blog.naver.com/PostView.nhn?blogId=orion_203&logNo=130120579882 (첫 페이지 오류시 참고됨)
3. http://robin2.tistory.com/138 (위와 마찬가지)
4. http://guni.tistory.com/328
'Xen Server' 카테고리의 다른 글
| Xen Network 설정 및 domU 설치 (0) | 2013.03.05 |
|---|